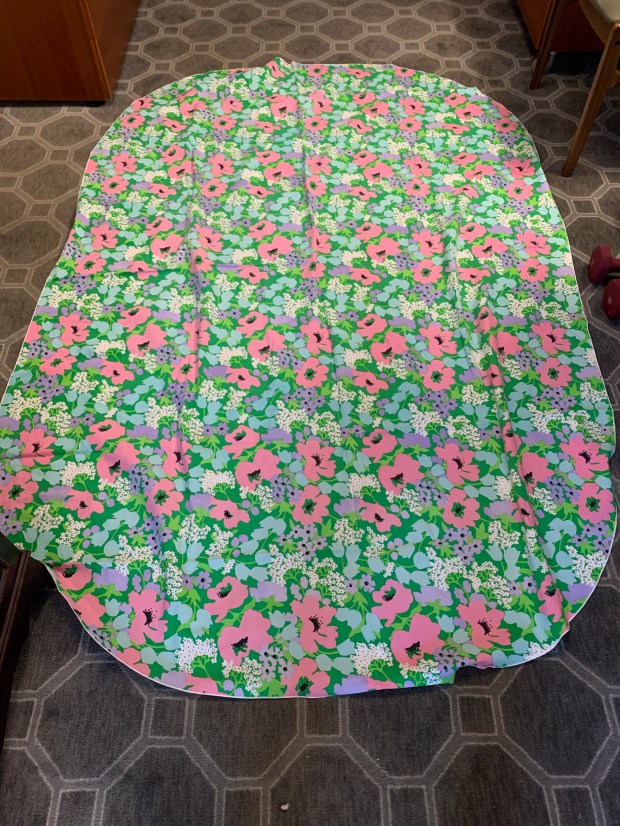
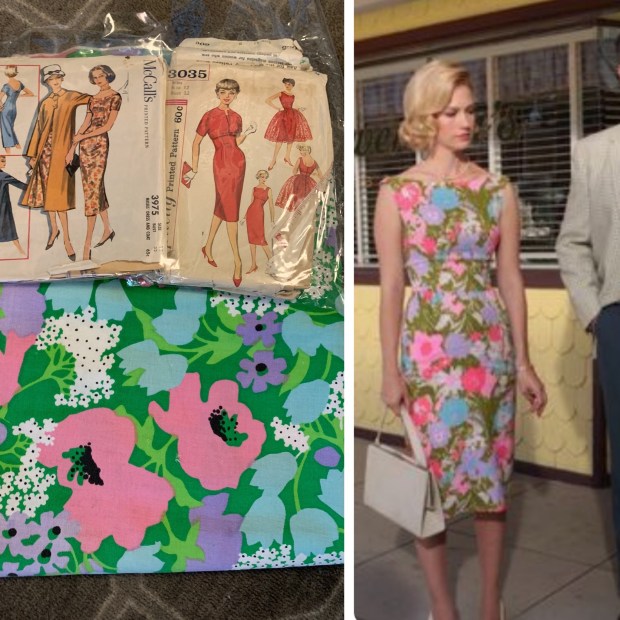
I have had this project in my back pocket for OVER A YEAR. I’m sure most sewists are familiar with that idea. Usually when I keep an idea at bay for that long, it changes over time and becomes something else. But I always knew I wanted to use this tablecloth to make a dress like to Betty’s below; the fabrics seemed so similar.
I pulled a few vintage patterns, but finally decided on Simplicity 3035.
I wish I’d had enough to do the little jacket, too!
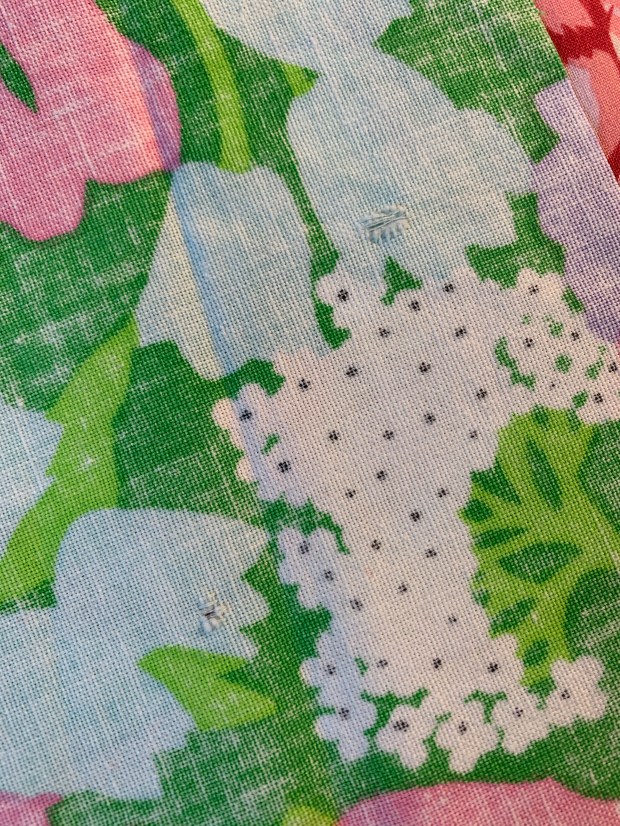
The first issue I had was a biggie: The tablecloth was quite damaged, and I hadn’t noticed it before! Luckily I had plenty of room to play around with placement of the pattern pieces; it still took me over an hour to place them in the spots with the least damage. The large skirt pieces were especially challenging.
The tablecloth was riddled with holes like these throughout.
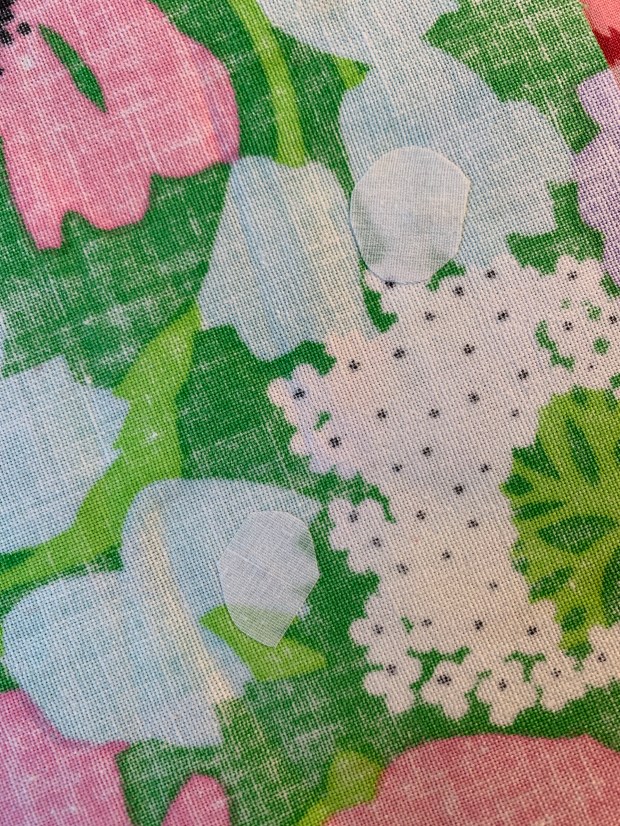
Once I got everything cut out, I still noticed some holes as I sewed. I just had to patch them up and hope for the best! My biggest concern was the front skirt piece and of course there was a giant hole that I hadn’t noticed. I used a scrap to make an applique and used Wonder Under to put it on top of the damaged flower. It’s not noticeable to anyone except me (I hope).
The iron-on patches
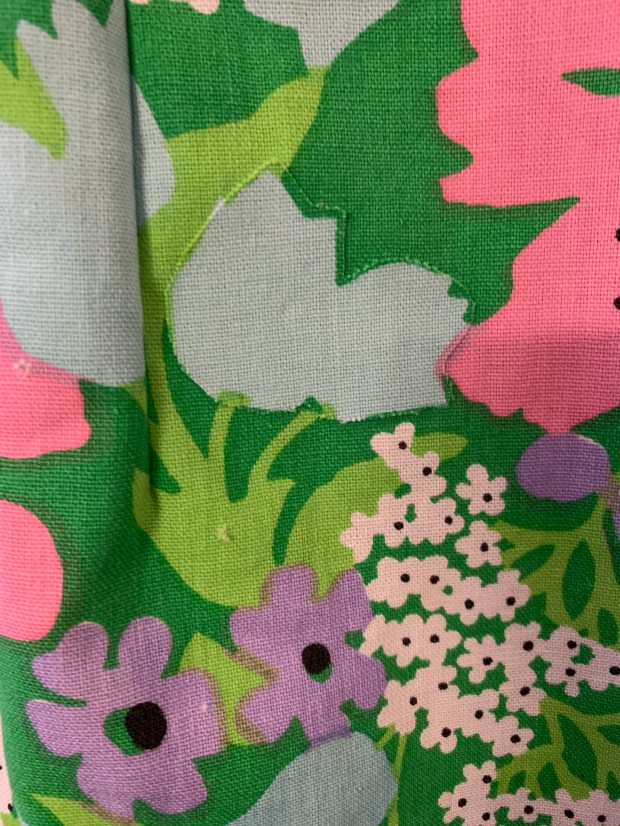
appliqued flower – noticeable only up close
This was a very quick and easy make! I definitely needed to add that trim under the bust:
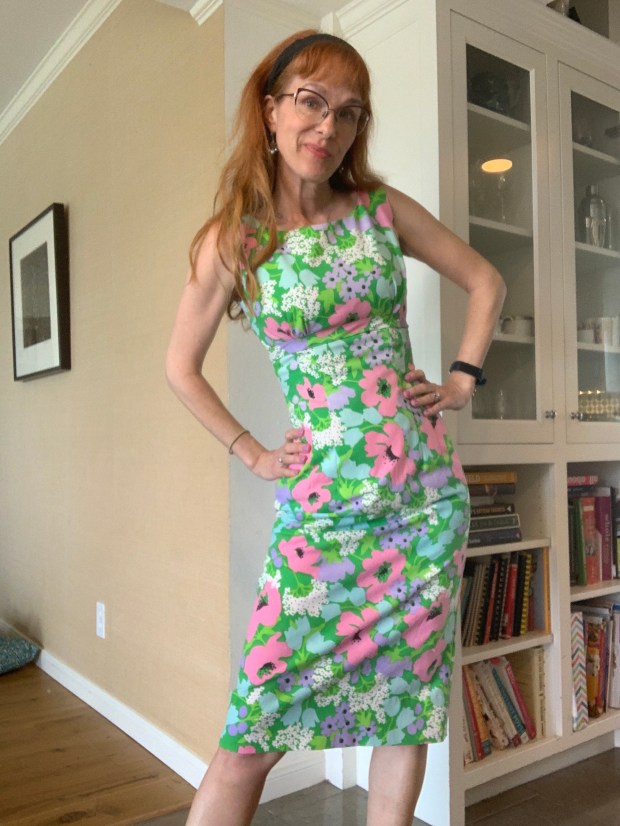
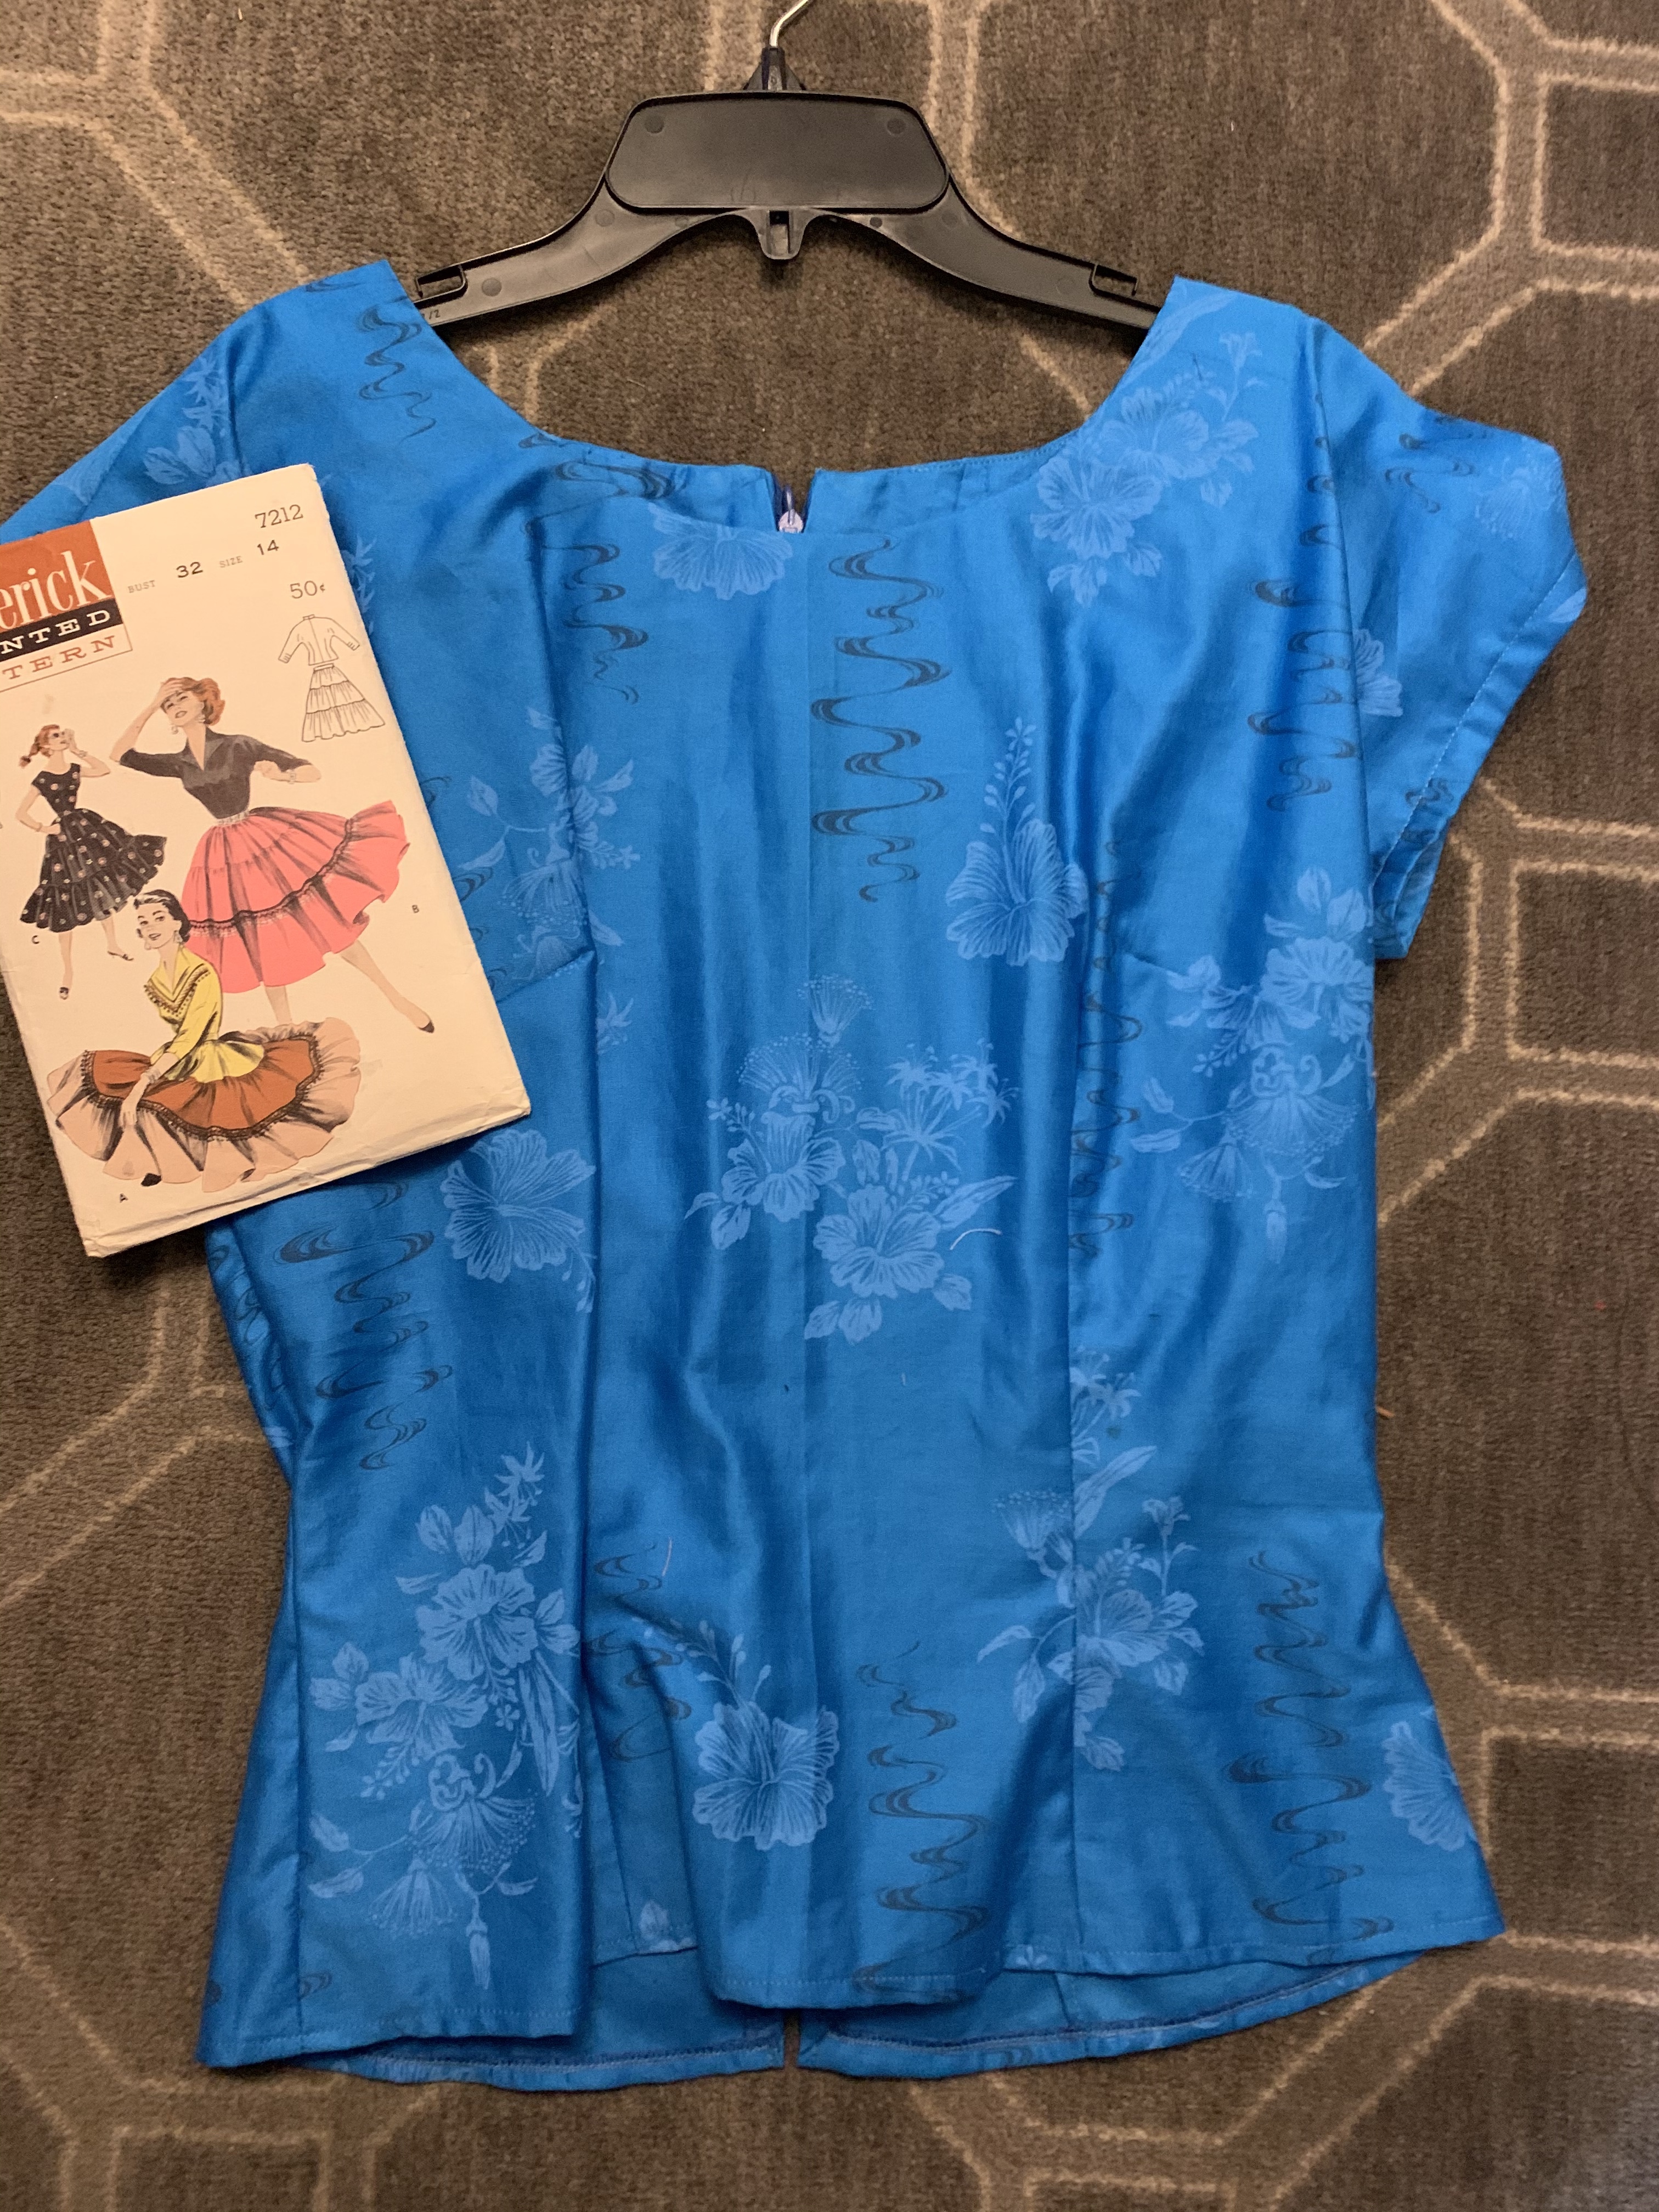
I have been meaning to write about this dress since I re-started the blog! But life and stuff got in the way, as it does. This is one of my favorite shirt dress patterns – mostly because it only has one button and my machine hates it when I try to do buttonholes. So I try to avoid them. But I do love the look and practicality of a good shirt dress!
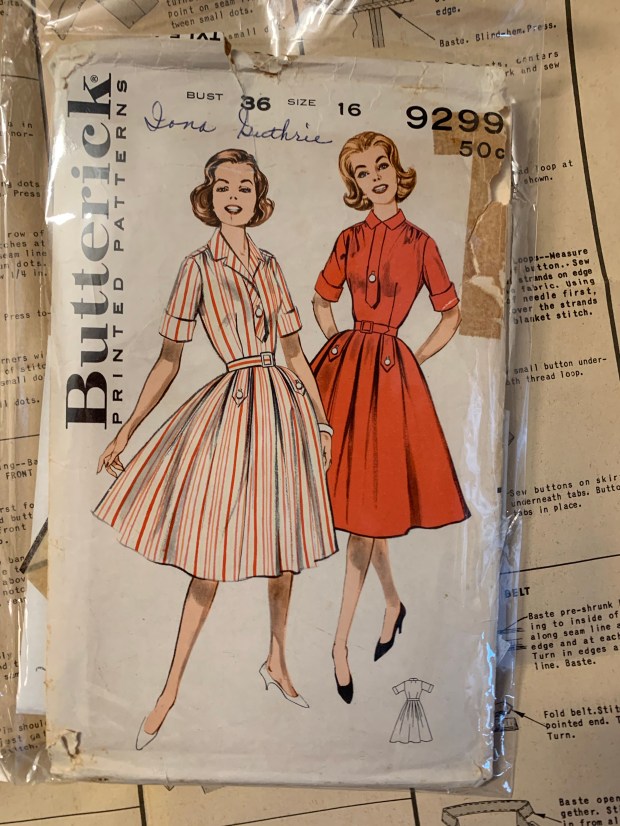
Butterick 9299
I decided to omit the waistline tabs; they’re unnecessary (and it meant more buttonholes), and I had to take in the waistline as it’s a vintage pattern and only has the one size included. I just eliminated the seam allowance on the waist to take it in and hoped for the best! Luckily it ended up fitting perfectly.
There are some differences in the way vintage patterns gave instructions, and we now know that there are easier and less confusing methods to use.
One extremely confusing thing was the way they instructed you to do the collar: I must’ve spent an hour trying to figure out how they wanted me to do it! It’s even confusing to try to explain. Rather than having the collar in two pieces, it was one large piece that you sewed over the front tab. Then it had to be notched to fit on the shoulder.
They also advised doing a flat sleeve rather than a set-in sleeve, which I’m not used to and I actually think is harder than sewing the sleeve and side seam first and then attaching them. I chose to do it my own way.
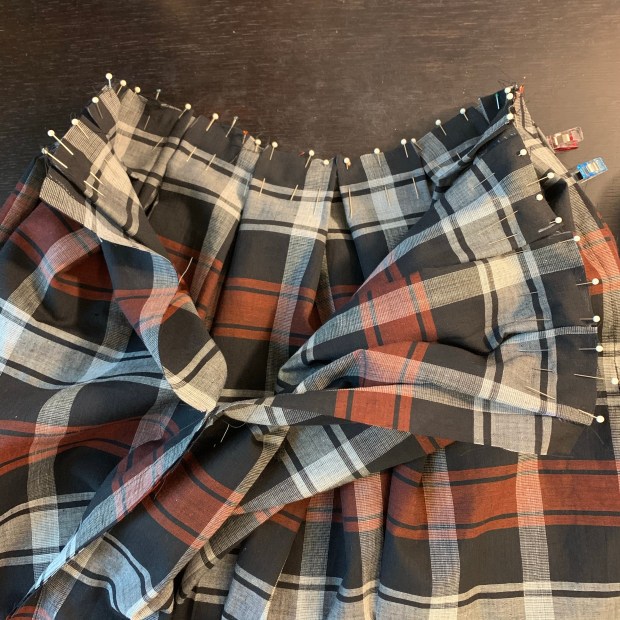
Getting the skirt pleats correct took forever since I had taken in the side seams of the bodice. Look at all that pinning!
That was all the hard part; the rest was fairly straightforward. To get an authentic vintage look, I used seam tape for the hem.
It looks so pretty and finished.
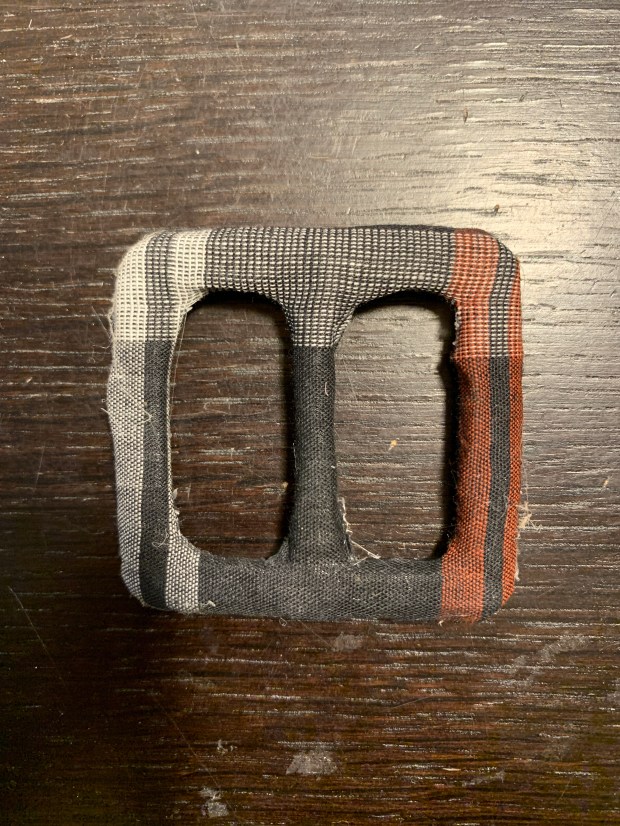
Lastly, I really wanted to do an authentic vintage belt. I have all these old belt making kits, but I was missing the stick-on part for the size I wanted. I tried to improvise, but it didn’t work out. I just ended up doing an extra long tie-on belt.
Belt making kits and the ugly buckle I ended up throwing away.
Despite the issues, the fit is great and I love the end result! The fabric is a vintage plaid lightweight cotton I picked up at a garage sale. I think the dress is pretty true vintage and something that would’ve been made by a home seamstress in the 1950’s!
Next week: a Betty Draper replica dress made from a tablecloth!
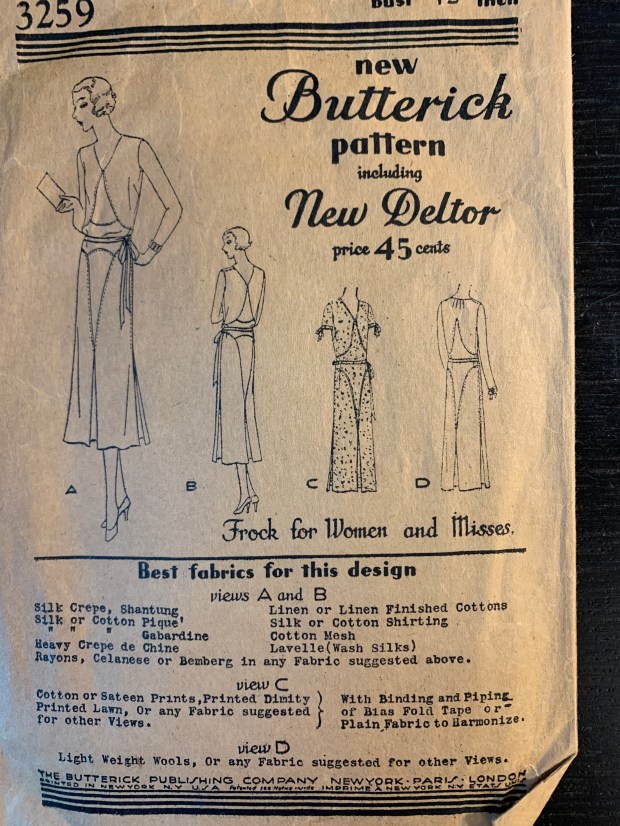
My mom recently came to visit, and she’d been hanging onto these patterns for me for a while; she found them while cleaning out a relatives belongings and knew she had to save them from the trash. I hate to think about how much of our sewing history gets thrown out because people don’t know these patterns might be valuable to some or they think no one wants them!
Aren’t they LOVELY?!?And they are 42″ bust, which is very rare to find in vintage patterns.
Now that I had my hands on them, I could start doing some research on the dates and details of these lovely “frocks for Women and Misses”.
“New Butterick Pattern including New Deltor” states the cover. We know that Butterick patterns are still around, and they were first created by Ebenezer Butterick in 1863. “New Deltor” simply means that written instructions were included. There’s more to the name and story behind it but a Google search can give you more information.
Explanation of “New Deltor” in image, which also states that the New Deltor was patented in 1921.
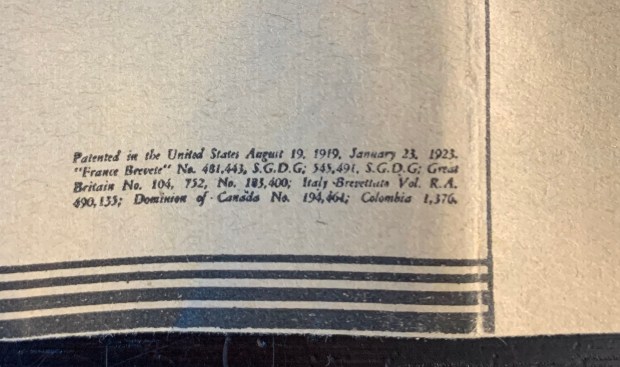
I was very curious of the actual dates these patterns came out. About a year ago, when my mom sent me pictures of the cover, I had asked my “Vintage Sewing Pattern Nerds” facebook group, and they had guessed late 1920’s/ early 1930’s. Luckily when I (very gingerly) opened the patterns, there were some dates inside, and they dated the patterns even earlier than we thought!
“patented in the United States August 19, 1919, January 23, 1923”. I’m sure an expert pattern/sewing historian could tell me why there are 2 dates listed. Both patterns had these dates, and I am only assuming these are the dates these dresses are from.
Looking at the details of the pattern provided some other interesting differences in the way patterns were labeled:
Back of one of the envelopes. I guess the capelet on 2988 was called a “Bertha” .
The instructions were numbered with Roman numerals. These details are just fascinating to me.
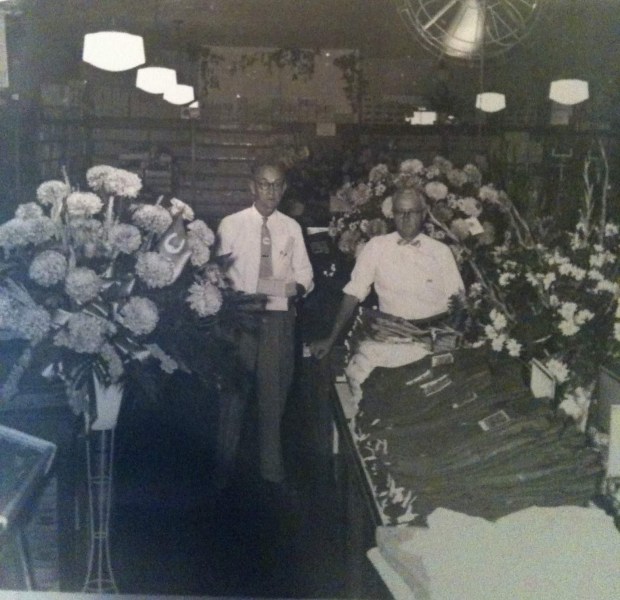
Aside from the actual origin and details of Butterick patterns, the history of how the pattern actually made it into my mother’s hands is quite interesting. There was a store in St. Mary, MO (about an hour outside of St. Louis, and where my mother is from) called Rozier’s Mercantile.
And we know if came from there because we have the actual mailing envelope!! How cool is that?! “Messrs. Jules Rozier & Sons Mdse. Co.” A picture my mom sent me of Rozier’s Mercantile, St. Mary MO
There is still a Roziers store in Perryville, MO, about a 20 minute drive from the original store, but the location this pattern came from is no longer there.
We can’t seem to figure out who in our family owned the patterns – the cousin who had them, neither her nor her mother sewed, and there aren’t any indications that I can see that they were ever used. I guess it was just fate that they ended up in my appreciative hands!!
All in all, it’s been a fun and fascinating trip through the history of these patterns and the trip they made to me! I never thought I would own patterns this old and they are in amazing shape for being 100 years old!
I’ve recently come into a LOT of great vintage, with some pieces coming to me from my husband’s grandmother, and some from a friend of mine who loves to thrift and passes along what doesn’t work out for her. I’ve put my current project on hold in order to alter some of these pieces in the hopes of selling some of them soon! I’m also working on some other things for a friend for the upcoming QuiltCon, which will be taking place here in Austin at the end of February. So although I’d planned to write about my vintage pattern project this week, other things are taking precedence!
When my friend passed this gorgeous handmade wiggle dress along to me, it was obvious that it was going to be way too small, so I thought “hey, this won’t take long to fix!” Well, you know what happens when you say something isn’t going to take long.. I became OBSESSED with making this work.
I mean, wouldn’t you be obsessed? LOOK AT IT.
The most obvious thing to do would be take out the back darts- easy and there are darts in the skirt and the bodice so everything should line up. I thought that would give me plenty of room. NOPE. (Usually I don’t like to take darts out for fit because I worry about seeing the holes in back from ripping, but this fabric is so black you can’t tell. AND I learned a magic trick for really pressing the fabric flat so you can’t even tell there was a dart in it! You dampen the fabric, wait a bit and rub it, then iron, pressing the fabric with your fingers as you go- works better than vinegar!)
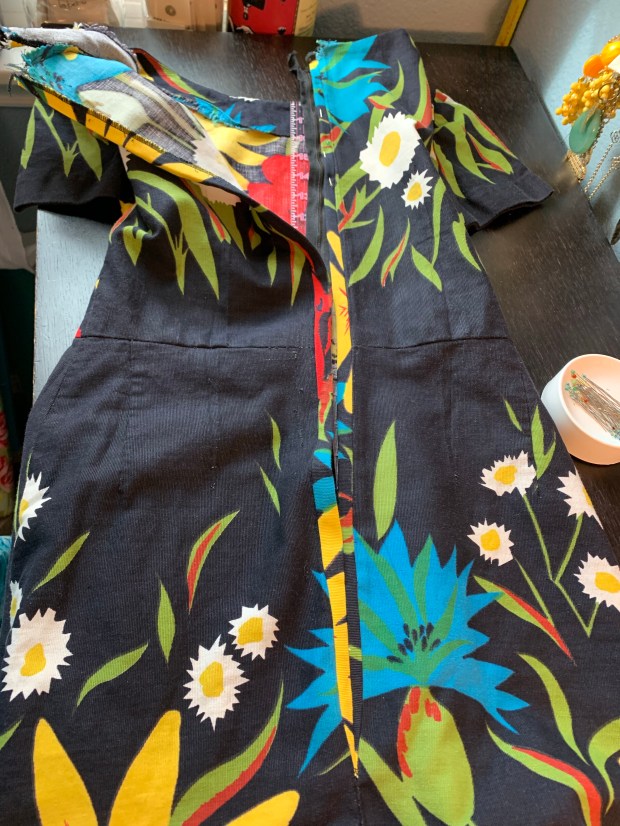
So my next step was to check the hem. There was plenty to take out and expand at the zipper area (Oh I didn’t mention the zipper was destroyed on this dress when I got it, so I would’ve had to replace it anyway). Using the hem fabric is a natural choice as it would match. But since this is a border fabric it wouldn’t match exactly. BUT I REALLY WANTED TO WEAR THIS DRESS. I didn’t get pictures, but I had about an inch and a half to work with.
The hem after I cut off length and serged; I had plenty of excess to work with and still have the dress be the length I wanted.
I cut the hem strip evenly and sewed it to each side of the back center. It was bulky but did I mention I really wanted to wear this dress?
The strip sewed onto the back center
The part that was a real pain was doing a lapped zipper with all that bulk of the extra seams I had sewed on. After some seam ripping, I got it!
Inserting the lapped zipper.
I think it was worth it! And I’m not thrilled by how the fabric doesn’t match the back completely, but I hope that people would think it’s done on purpose. And also, I don’t care. Now I can wear this colorful vintage dress!
The back!Ta-da! Posing in my backyard like a goof.
Next week maybe I’ll get back to my regularly scheduled project, but who knows? So many fun vintage alterations projects coming up to show off!
It seems I am constantly rotating my vintage wardrobe: buying new things, feeling guilty about buying new things, going through my closet and thinking “what do I REALLY need?” (hint: I don’t “need” any of it ha!), and finally selling some things to make room. Recently I was looking at a vintage dress for sale and thought “I have a vintage pattern that would work for that! Why do I need to buy it”? Well, I’m going to dust off my vintage patterns and fabrics and get to work! What’s the point of having all these fabulous items if I’m not going to use them?
Look at those florals!! sigh.
Some recent vintage finds from a garage sale and Austin Creative Reuse; this isn’t even one quarter of my fabric stash! I tried to take pictures of my patterns but that was just a big mess. Let’s just say- I have too many!
I’m determined to work through what I have with the fantastic library of vintage patterns I already have (of course I wouldn’t pass up a good opportunity to buy more! In fact, I just bought some of the above fabrics yesterday. Oops. ) Below I’ll go through some projects I have in mind for the year plus the inspirations behind them. No surprise, some of those inspirations come from Mad Men. The clothing on that show is SO GOOD. This will also be something I can come back and reference if I’m feeling uninspired or don’t know what my next project will be. So, here goes!
I got this amazing cotton pique floral border print from a Facebook seller. It was too unique to pass up! I thought it would look good as a Butterick 6453 dress with a white top, a la Megan Draper’s “Maria Von Trapp” outfit from the Tomorrowland episode. Here’s this one again!! Since this has been in the pile the longest, it is definitely going to be my next project when I finish the shirtdress I’m currently working on (which will be the subject of my next post!)
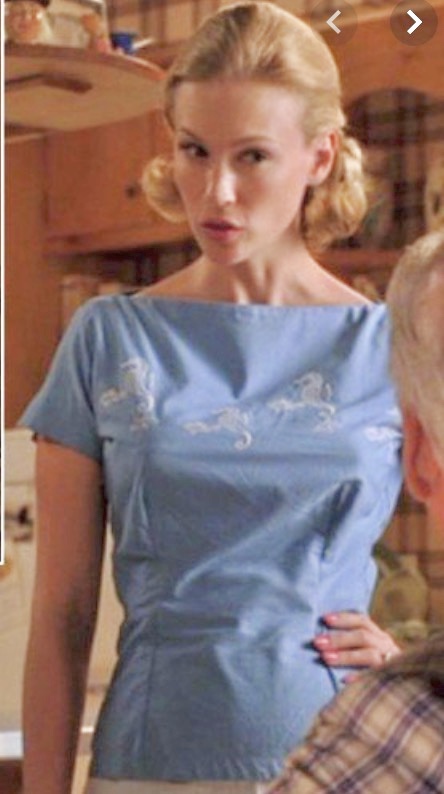
I’d really like to use my smaller fabric pieces to make more of these vintage Butterick tops, which I noticed Betty wearing similar on the “Long Weekend” episode.
Now for some non-Mad Men inspiration! I LOVE blue florals, and I have quite a collection of vintage and modern- way too many for them to be hiding in a drawer. While perusing Vixen by Micheline Pitt’s website, this one caught my eye! I don’t have many fitted dresses, so it would be a nice addition to my closet.
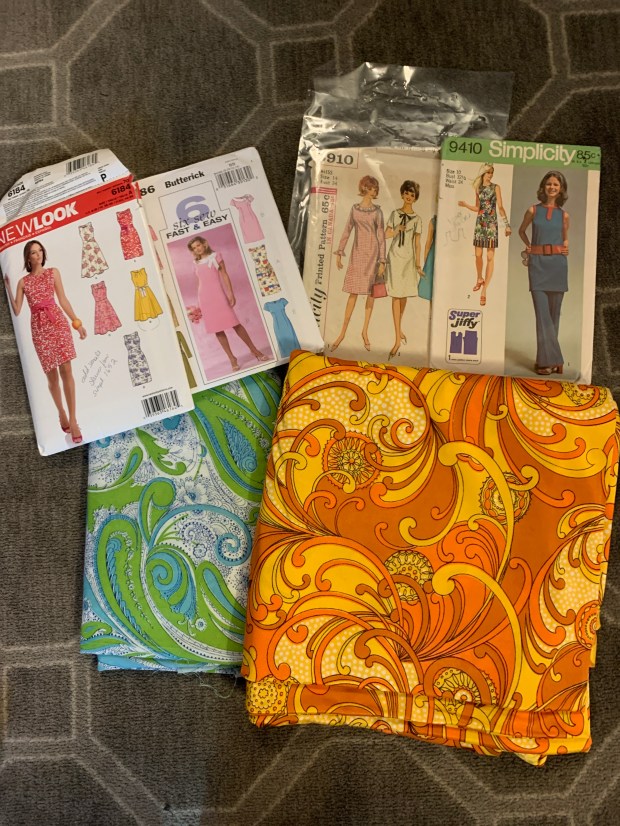
For more small yardage stash-busting: This Gertie Simplicity 8882. I love the little peplum and the fitted top! (This is Gertie fabric, too) I wear aprons just about every day, and would love to make one with multiple pockets!! Also good for small yardages. Probably easiest are simple shift dresses with these groovy 60’s fabrics! The orange is a polyester knit, which isn’t my comfort zone, but with a simple pattern it shouldn’t be too bad. And lastly, a high necked, darted bodice, back zip dress. It looks simple BUT I’ll have to grade this one up because vintage patterns were not multi-sized like the one’s we have today. This one is a 30″ bust. Uh, no.
I think I definitely have a start on my plan for the year! It sure beats spending two hours trying to think of my next project, which is my usual plan. I enjoyed having a challenge with the Liz dress, and I’m excited about these projects because working with mostly vintage patterns is more of a challenge than working with modern patterns. The pattern companies expected that every woman knew how to sew therefore there weren’t extremely detailed instructions, some of the techniques they used are different (in my next post I’ll show some of those differences and how I completely disregard them and do things my own way), and as I pointed out above, the patterns came in one size only and sometimes need to be graded up or down.
If you’ve read this far, thanks! I’m pleased that so far I’ve kept the blogging going 2 weeks in a row, and stuck to my Sunday morning blogging pledge. Maybe I’ve given you some inspiration for your next project! I’m excited to dive back into those buckets of vintage patterns that have been hiding under my sewing table.
Making 2020 a year of fabric stash busting and sewing through my vintage patterns.
Here I go again! I’ve tweaked my 2019 New Year resolution (which I wrote about what- 3 blog posts ago? I have been terrible about keeping up this blog.) There are so many cute vintage dresses I see on Etsy, on Instagram, etc and would love to buy, but I have a hard time justifying that when I have a very full stash of vintage fabrics and patterns. So this year I am resolved to use some of those items that are collecting dust and challenge myself with some of these harder vintage patterns! I’ll do a post soon with some projects I have in mind, but for now I’ve been meaning to share my Charm Patterns Liz dress and all the work that went into it!
The finished dress in all it’s glory. Look at that super full skirt!
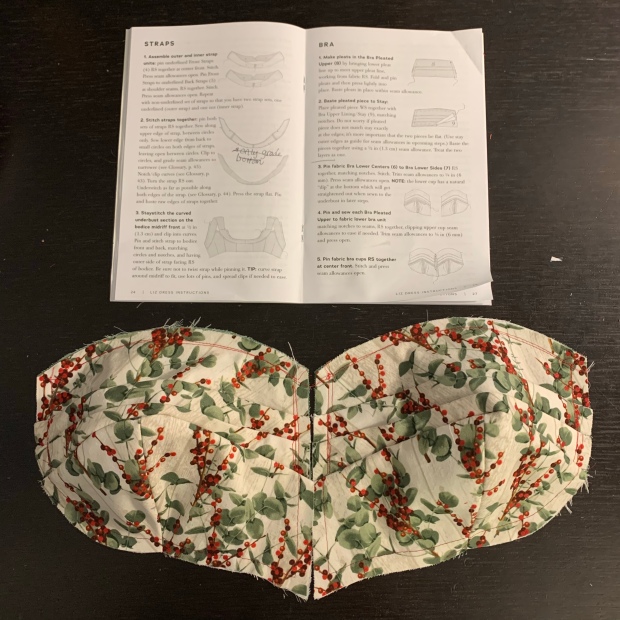
This dress was definitely out of my comfort zone but I was getting tired of doing the same old darted bodice. I knew it would be a challenge, but with it being a Christmas dress I figured if I messed it up I would only wear it once a year anyway! And I wanted to really take my time on a project. In the pattern insert Gertie mentions that it definitely is something you want to take your time on and quotes Liz Taylor: “It’s not the having, it’s the getting!” Going in with the attitude that it would be slow sewing definitely helped. Here’s a bit of the process:
I spent about an hour in the fabric shop picking out my contrasting fabrics- I didn’t want any drastic differences in the fabrics. Settled on these 2 RJR Fabrics, and Moda Grunge fabric for the lining.
Here are all the pieces cut out! Dress, Lining AND underlining! And facing as needed. It doesn’t look like much, but it took a while!! One fabric is for the bust and tie, the poinsettias are the skirt, midriff, and strap.
Of course with a pattern this complicated, you must make a muslin, and I made TWO! I was really expecting that I’d have to make about 4, so I consider myself lucky. The only change from before to after was that I had to go down a cup size. Such a difference!
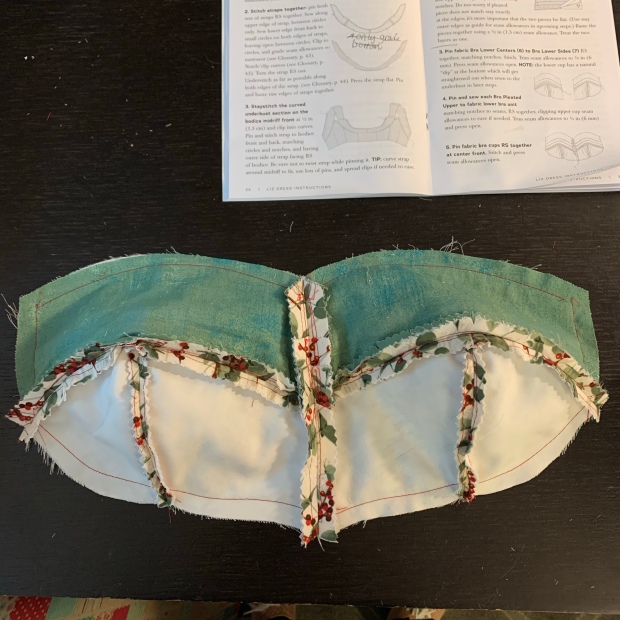
There was a LOT of this going on- clipping. And notching. And basting. Those cups are curved so much that you have to clip and notch to get the pieces to match up.
The outside and inside of the bust piece- composed of 6 pattern pieces! This lapped zipper had to be sewn onto a few layers of fabric- considering that, I’m pretty pleased with how it turned out! The shoulder strap is all one piece that comes around the front under the bust- a bit challenging, but I just took it one step at a time. Gertie’s instructions are very thorough! The inside of the bodice- I chose not to line the skirt, although that was an option. I’m very pleased with the finished dress and feel so glamorous when I wear it! Now I need to make one that’s not Christmas-y so I can wear it more often!
Feels so good to get this blog going again. I’m going to set a goal to post once a week, probably on Sunday mornings (when I’m normally reading the paper, but it would probably help my mental health to do this instead)!
I have an idea for the direction I want to take this blog and I hope some folks will follow along with me on this sewing journey. Happy 2020!